My Pantry Organization
I have organized my pantry a couple of other times, using containers I had around the house. While those systems were effective, they did not give me the visual appeal I was after in my home-organizing adventure.
The goal to any space I organize, is to keep the organizing system as cheap as possible, yet as effective as possible. I realized that I was more apt to cleaning and organizing when I was proud of the space. In our last home, we had a lot more space but things were dingy, the walls were stark white, and there were a lot of dark areas. We ended up moving before I could paint or add extra lighting to certain “problem areas.”
My point in saying that, is that it is important, especially to someone like me, that I am proud of the space. It takes a lot of effort, time, and sometimes money to spruce up an area that no “organizing skills” can achieve. In our new home, we have fresh paint, ample lighting, and we have some updated fixtures as well. I suppose my goals in creating a comfortable bungalow for my family begins with walls and light. Without those things, I do not feel as motivated to clean or organize. With that said, if you do not feel the motivation to clean or organize, try sprucing up the space and see what you envision then!
Moving on to the good stuff:
Organizing My Pantry!
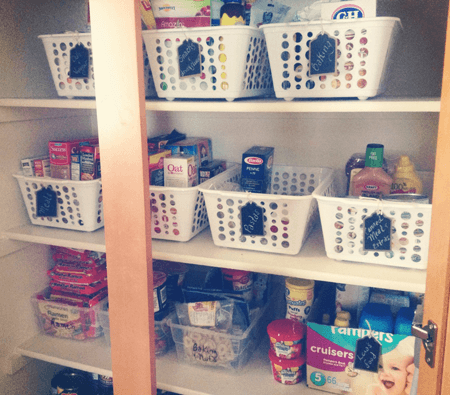
Now that I have a space that I can be excited to take care of, I was extremely motivated to organize our pantry one last time. I drove to our local dollar store and picked up seven white plastic bins for $1 a piece. Then, I snatched up some adorable chalkboard labels from Target {in their dollar spot}–just $1 for eight labels!
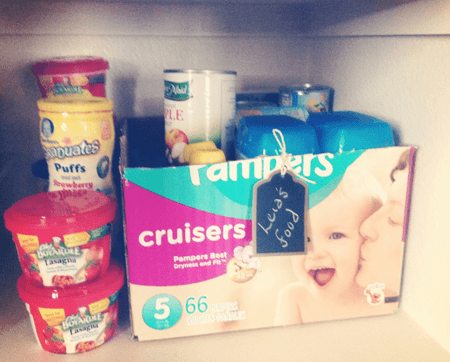
I used three shoe box containers that I already had as well, but they are just under $1 at Walmart. For the last bin, I cut an old diaper box. When I was reorganizing and adding matching bins, I decided to keep this one because it only houses my daughter’s different foods and snacks and I thought this bin was appropriate for her :).
I started dividing up my food by category and kept my canned goods {other than canned meat} aside. I aligned the bins to fit as many as I could on one shelf, and I finished with even more room than I had before.
The label titles I have are: Oils & Vinegar, Snacks & Drink Flavor, Baking, Meals, Breakfast, Pastas, Canned Meats & Extras, Ramen, Recipe Starters, Baking & Nuts, and Leia’s Food. All of my canned vegetables, beans, soups, etc., are on the last shelf.
I combined a lot of categories together because I did not have enough of each one to fill an entire bin. {Yes, we have an entire bin of Ramen, which will probably get donated soon because we never eat it anymore.}
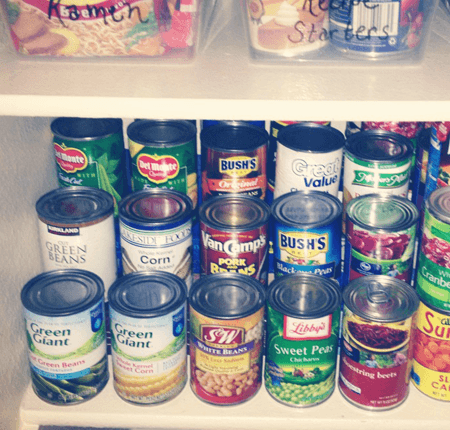
After I reconfigured the first few shelves, I had lots of chaos on the bottom shelf with all of my canned goods. I wanted to keep all of them in one place but I also wanted to be able to see each one. I started shopping for can racks and can shelves but for as many as I needed, I was looking at spending a lot of money…just on my cans.
In my efforts to be frugal, I discovered an awesome trick. I used old college text books! I staggered them in a tiered shelf-like way, and stacked every single one of my cans! Not only are they neat and orderly, but I can see their labels! It was a fabulous way to up-cycle those old textbooks, that I am not yet willing to part with, and put them to good use.
You could also use old Phone Books for this trick. And the best part: it is FREE.
Now everything matches, everything is streamlined and simple, things are easy to find and easy to access. Talk about visual appeal! I love opening my pantry!
Having this space organized helps me be more productive because I do not spend my time searching for something, or making a grocery list.
My entire pantry organization cost me $8.00. This just proves that you can achieve that beautiful “magazine” look on a tight budget!
Copyright © Rachel Criner, Moms of Faith®, All Rights Reserved


